
Article Objective: To assist users in navigating the Active Platform to perform a consolidation for a client. Context: Active Ledger & Reporting enables you to consolidate the data from more than one dataset into a single consolidated dataset. This can be used when dealing with multiple entities, and grouping data in order to produce consolidated reports for managing, or even for producing formal consolidation financial statements for financial reporting statements. It can also be used in simpler cases where you have a single entity, but accounting information for different divisions or business units is run through independent accounting files that need to be aggregated to build the full picture for the entity. There are ways to manage the data for these common scenarios, and perform eliminations, either manually or using automation through a well set up chart of accounts. TABLE OF CONTENTS |
Managing data for a single entity
When working with a single entity, you create all the necessary datasets in a single file for that entity for the period. As an example, a client may have two office locations that they operate out of and maintain two desktop based accounting files to record the transactions for each office separately. Within Active Ledger for the client, two datasets can be created for the same financial year to bring in the different accounting files as below.

Once ready, you can then click New consolidated dataset.

In the new consolidated dataset, click Add Datasets.

Choose the relevant datasets that you wish to link to the consolidated dataset using the checkboxes and press Select.

Press Create Dataset which will save the consolidated dataset.

You will then have a consolidated dataset that you can use for reporting to show the consolidated position of both office locations for the year.

Managing data for multiple entities
Active Ledger offers two approaches for managing the underlying data for multiple entities. The most suitable approach depends upon your preference for flexibility or streamlining data entry.
1. Standalone entity file approach (recommended)
Create a file for each individual entity, and manage the datasets in those individual entities. A separate consolidated file will then create additional datasets to import data from each of those individual entities as required, in addition to hosting the consolidated datasets.
Why choose this approach?
Having data maintained in each individual entity file enables you to have a bespoke chart of accounts for each individual entity, which can differ from the chart used in the consolidated file. Also, this approach works if you have previously done work for this client in individual entities, and subsequently want to create a consolidated file without duplicating the work done in each individual entity.
2. Single consolidated file approach
Maintain a single consolidated file for the entire group. Entities will be linked to the consolidated file and datasets with working data will exist only in the consolidated file. You will continue to have functionality, such as reporting and workpapers, for individual entities inside of this consolidated file.
Why choose this approach?
You want to optimise your work by maintaining only a single source of data and one chart of accounts.
The below sections look at how to create a consolidated dataset using each approach.
Standalone entity file approach (recommended)
This approach is only used where a standalone Active Ledger file is maintained for each client within the consolidated group.
First, set up an Active Ledger file for each entity and add data as you would for any normal standalone entity.
Next, to create the consolidated group ledger file, navigate to the relevant client group and click on LR logo next to the client group.

A dialogue will open which will enable you to name the consolidated file. Click Create File.

You then will be taken to the Datasets screen. Here you can link the relevant entities for the consolidation by clicking + Link Entities.

Link the entities to the consolidated file that you wish to include. You can also add other entities to the consolidation from outside of the group by pressing the X next to the group name and searching for your desired clients to link.
Click Select once done.

Now that you have linked the desired entities to the consolidated file, proceed to add datasets for each entity. Select your first entity in the list and press + New dataset.

Give the dataset a name, choose the appropriate dates and click Add New Source.

Note: DO NOT import the original data from the client accounting file again. Ensure that you import the dataset that you have previously been working on in the entity's standalone Active Ledger file by selecting Active Ledger as your source as shown.
Click Add Source.

The last step is to select which dataset from the source Active Ledger file you wish to import from. Press Load Data. Once the date and timestamp appears on the load data button, press Create or Save Dataset.

Once you had added the first dataset, proceed to do the same for all entities within the consolidated file by following the same procedure above.


Once all datasets have been imported return to the 'head entity' to create the consolidated dataset by clicking on the New consolidated dataset button.

From here you will be able to name the dataset, give it a date range.

Click Add Datasets to link the datasets for each entity to the consolidated dataset. Press Select.

Once all datasets are linked, click Create Dataset.

You will now notice a new consolidated dataset located within the datasets area of the head entity.

With the consolidated file created you can now proceed to the Accounts screen to manage the master chart of accounts as you would for any other file (see knowledge article: Accounts - overview).
Single consolidated file approach
This approach is only used where a standalone Active Ledger file is not maintained for each client within the consolidated group. The standalone entity approach is recommended for most consolidation scenarios. If your job is only to prepare a consolidated set of financial statements and not to produce standalone entity financials, you can use this approach.
After all entities have been created, create the consolidated group ledger file. Navigate to the relevant client group and click on LR logo next to the client group.

A dialogue will open which will enable you to name the consolidated file. Click Create File.

You then will be taken to the Dataset screen. Click + Link Entities.

Here you can link the relevant entities for the consolidation. Once done, click Select.

You can now begin to add data for each entity directly by clicking on the entity on the left-hand side menu. Click + New dataset on the first entity and proceed to add the data.

Fill in the details for the dataset, including name, dates and press Add New Source.

Select a source to bring data into the dataset from. For this entity example, Xero will be connected. Click Xero and Add Source.

Select the Xero file to connect to, press Connect and then Add Source.

Select the frequency of import (monthly, quarterly or annual), press Load Data and then Save Dataset.


Proceed to add datasets for each entity within the consolidation.
To add datasets from a non-cloud source, you will need to upload via Excel. Refer to this knowledge article for assistance: Datasets - Excel trial balance import.
Note: If importing data from Excel, ensure that you select the correct file to import the data into, i.e. the dataset within the consolidated file as shown below. You may need to use the search bar to find the right file.

Once all datasets have been imported to each linked entity, return to the 'head entity' to create the consolidated dataset by clicking on New consolidated dataset.

From here you will be able to name the dataset, give it a date range. Click Add Datasets to link datasets to the consolidated file.


Click the Create Dataset button to finalise the process.


With the consolidated file created you can now proceed to the Accounts screen to manage the master chart of accounts as you would for any other file (see knowledge article: Accounts - overview).
Eliminations
In order to perform eliminations, two approaches are provided. The automatic (account-based) approach automates eliminations based on tagging accounts, while the classic approach enables you to perform elimination journals. The two approaches are documented below.
1. The automatic (account-based) approach
In the automatic (account-based) approach, specific accounts are tagged as being 'consolidated' accounts, and Active Ledger then determines the elimination entries. This approach is by far the simplest, but requires two things:
- That all inter-entity transactions exist in accounts which exclusively contain inter-entity transactions
- That the balances of all of these accounts across each consolidated dataset balance to zero. Note that individual accounts need not balance to zero, but the sum of all consolidated accounts across all consolidates datasets must balance.
If these rules are met, consolidation can be performed as follows:
i. Nominate consolidated accounts
If there are no inter-entity or intra-entity transactions to be eliminated, you can proceed straight to the next step.
In the Accounts screen of your consolidated file, find each account which contains inter-entity transactions, click on the edit icon on the right and within the edit screen select the 'Consolidate' checkbox as shown below.


ii. Configure the reports
Now you are ready to report. In the Reports tab, prepare a new report template to work with.
Ensure to select the entity as the head entity of the group, tick the 'Consolidated Report' checkbox and type the consolidated group name and entity type for account terminology which will flow through the report.

In each column, you can add any consolidated dataset or group dataset to the report by selecting them from the dataset drop-down menu. These datasets provide a special 'Consolidation Mode' property that lets you choose what you wish to display:
- None: will show the summation of all accounts inside the consolidated or group dataset, without applying any eliminations
- Elimination Entries: will show just the elimination entries
- Consolidated Balances: will show the summation of all accounts after taking into account elimination entries
Note: In many cases, you will show the consolidated or group dataset twice, once showing the 'Eliminations' view, and once showing the 'Consolidated Balances' view.
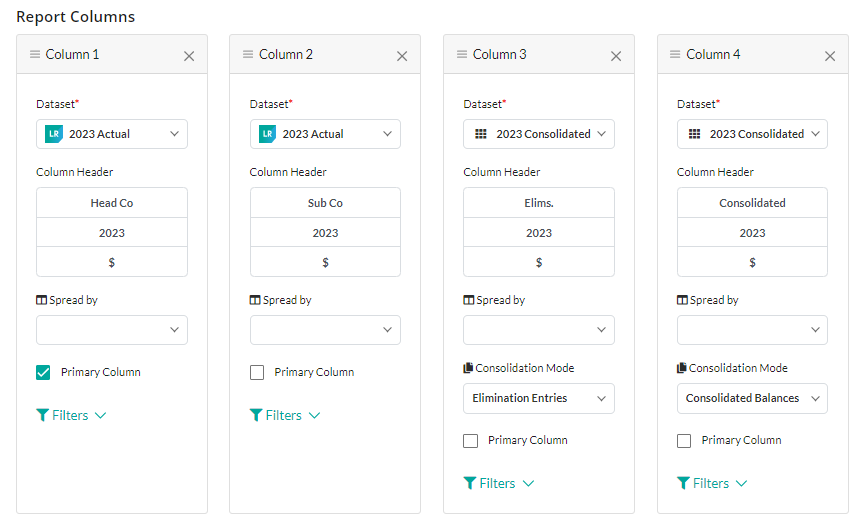
The way in which the data is displayed can be customised. For a conventional consolidation report which shows each entity, an eliminations column and the total consolidated balance, you would have a column configuration that looks something like the following:
2. The manual elimination journals approach
The manual elimination journals approach allows you to create consolidation journals which serve to calculate the eliminations. This approach is both more flexible and more time consuming, so the streamlined approach is preferred wherever possible.
In the manual elimination journals approach, consolidations can be performed as follows:
i. Perform the eliminations within an eliminations dataset
To do this, create a dedicated dataset to house the elimination journals. Click + New dataset.

For the source, select one of the existing sources which contain the most common accounts that you will journal to/from. Alternatively, create a new Excel source and call it 'Eliminations' if you prefer to keep all elimination accounts separate following the steps below. Click Create Dataset.


Once your dataset has been created it will sit just like other datasets within the head entity.

Next, navigate to the Journals tab in the Dataset tab where you can enter the consolidation journal entries. Click + New Journal and fill out your journal. If you have created an eliminations dataset, you will need to create new elimination accounts to perform your journal entries.

Once done, add this eliminations dataset to the consolidated dataset. Click on the consolidated dataset.

Click Add Datasets.

Add the eliminations dataset and press Select.

Press Save Dataset.

Finally, review the Accounts screen to ensure any accounts introduced by the journaling process are correctly allocated to the corresponding Active Ledger Accounts.
ii. Configure the reports
As with the streamlined approach, you can now add the consolidated or grouped dataset as a column. However, this time set the Consolidation Mode to 'None', which, given it includes the eliminations dataset, will automatically show the full consolidated balances. If you wish to show a separate eliminations column, you can create a column and use the eliminations dataset you created earlier.

If you wish to show a separate eliminations column, you can create a column and use the eliminations dataset you created earlier.
